
Ain't no party like a Kingdom Death party, 'cause a Kingdom Death party don't...
Stop. Time out. Let's recap here: I finished my very first Kingdom Death miniature.
Let's let that sink in. In 2014, I bought the "Pinups of Death Hard Plastic Collection" and I've been too intimidated to assemble and finish painting even ONE. Sound familiar? I know many people that are more collectors than active painters of these minis (and that's totally okay). For a beginning painter, they're challenging to assemble and paint. Many people hoard them until they feel they have the skills to tackle all that skin and hair and NMM metal. And if you're never ready to paint them? Well then, just keep collecting and when you decide to commission them for painting or sell them to a good home, you know who to contact– no judgement here :) Without further ado...
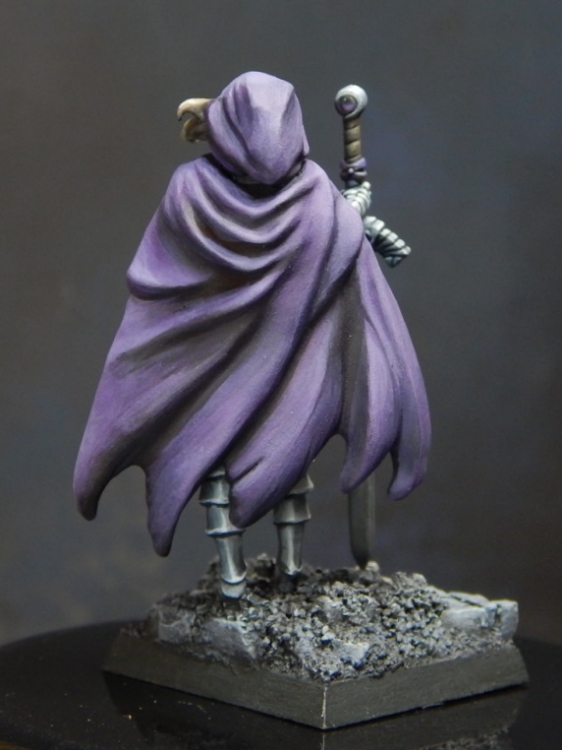
My Twilight Knight was the very first miniature I tried to gap fill with green stuff. The Kingdom Death models, especially the plastic, require gap filling and, for the longest time, Twilight Knight sat on my "someday shelf" (a.k.a. "shelf of shame") without a head or cape, which was damn creepy. I finally convinced myself to spend the time to complete her for my own personal enjoyment– a rare opportunity– and I decided to try a few things:
- Paint high contrast
- Silver NMM practice
- Limited color palette
- Unconventional skin tone
- More "painterly" approach
Long story short, I feel like I incorporated each of those goals in a way:
- High contrast in the sword, leg wraps and tones all the way from "Pure Black" to "Pure White" in the NMM
- NMM (Non Metallic Metal)– always a challenge! Recently, I experiemented with gold. This time: silver.
- Limited palette using two leather browns, neutral black, pure black, pure white, and two purples
- Using a pink/purple cold skin tone rather than a warm skin tone like I tend to favor
- Not blending too much in the large expanses of fabric– take a look at her cloak (more on that below)

More about the "painterly approach": Anthony Rodriguez, from Pirate Monkey Painting, posted an interesting perspective: What if we removed ourselves from the obsession with perfect blending and welcomed a more painterly approach? Now, those aren't his words exactly, but if you want to know more about what I mean by "painterly", it's about incorporating creative application of color theory, visible brushstrokes and incorporating dynamic values, or contrast, within each piece. Now, I'm not claiming I have all these elements perfected in my Twilight Knight, but I did start to dabble in the idea of a "bigger picture" rather than hyper focusing on details. Check out Anthony's work on Putty & Paint here. It's a bold idea to stand up and say "We focus too much on blending!" and there prolific painters whose artistic success isn't limited to ultra-clean, obsessive technical paint application.
Ooookay, I'm going off on a bit of an artsy-fartsy tangent and probably losing some of you. To sum it up? James Wappel. You've seen his stuff, right? If you've spent time in the industry or attended Adepticon or other conventions, you've probably heard of him. If you're fairly new to painting tabletop minis, welcome! Check him out in the link above. Jim is a master– his painting is thoughtful, brilliant, and seemingly effortless. His work has traces of brushstrokes in it and it's beautiful– the very definition of "painterly". He wields his creative genius with a giant filbert brush ($8 each, including tax) and his knowledge of color theory is second to none. Now don't get me wrong, I sound like I'm totally kissing butt, however, it leads into my next point: his approach is incredibly different than my own and makes my eyelids twitch.
In fact, one of my first painting classes was with James Wappel and it centered around shaded basecoats and glazing. I thought I was in the Twilight Zone. I mixed paint and applied thin layers of glazes, only to feel like a know-nothing fraud. "Am I even doing this right?" I asked. I kept looking at my neighbor and peeking at what they were painting, thinking I was missing something crucial in the guided class. Jim was totally chill and supportive reassuring us, "Don't overthink it, just apply the glazes and see what happens. Everyones will be different and that's totally okay". For a Type A person like myself, I admit, the very concept made my brain short circuit a bit. I stuck with it, though I didn't know if my results were good or bad. I left with my brain reeling and thanked Jim for what I lovingly called, "Anarchist Paint Class" because it absolutely threw everything I thought I knew about painting straight out of the nearest window. And sometimes you need that.
I painted my Kingdom Death miniature in a way that I didn't obsessively blend the ever-loving **** out of each surface area. I'd never thought I'd see the day. Now that you've read all this, take another look at the back of her cloak. See it now? I'm not claiming it's anything ground-breaking, but for me, it totally is and I'm damn proud of it. So proud, in fact, that I entertained the idea of painting more Kingdom Death miniatures immediately afterwards since the intimidation factor is now lessened. Since I've bought more Kingdom Death miniatures than I should have over the past 2 years (haven't we all?) I decided to bring them all out at the same time, maybe to shame myself in a way. I grouped boxes, opened bags, organized my favorites, and realized I was looking at a significant personal and financial investment I need to start completing. Yep, better get on this! I cleaned and filed the Gold Smoke Knight (for someone else) and the Pinup Sci-fi Twilight Knight (for myself). I made a mess, though to me, it's organized chaos:
Completing the clipping & cleaning process:

I truly hate the assembly and gap-filling process, but I just can't bear to not have control over this part, since it directly impacts the overall quality of the paint job.
Here she is– everything but her sword since I need to attach that after I've painted her, uh, backside:
While I waited for the Milliput gap filling to set, I used the extra mix to fill in a base of a Reaper miniature "Cheetah Girl" sculpted by Julie Guthrie. I purchased her as an option to consider when I was looking for an anthropomorphic player character for the Secret Sophie miniature exchange a few months ago. I worked around the precast base and I will add a few rocks and different textural elements as it dries.

In the meantime, I have a doctor appointment for some onoing stuff I'll probably talk about later if I'm in the mood for oversharing. Long story short, I'm still working through some emotional and hormonal issues and I'm currently balancing two jobs for two teams which doesn't help the stress factor. I'm totally committed to it, since it will hopefully pay off in a career promotion for me down the road. Still, it's time-consuming and difficult to manage shifting expectations as I jump into the frying pan.
In the name of unyielding positivity: I'm grateful to still be able to make the time to paint and for the people who support me. If you're going through a rough time and can't show it or share it, for whatever reason, I hope you find some balance and comfort in life. In the meantime, I hope you can find joy in painting, assembly, or just the purest form of miniature glory: hoarding!
Until next time :)
