My Custom Pokey Tool

Everybody has a "Pokey Tool" for when the paint dropper bottle gets clogged. However, I don't. I have been using a wall push pin, which is not very effective. I've seen other pokey tools. In fact, many people at ReaperCon 2014 bought the metal skull pokey tool which had a very nice weight to it, but it just wasn't my style. I fully admit, I like cute things with big eyes like I'm five years old and it's ingrained into my very nature. (I'm half-Asian, or technically, "Pacific Islander" if you're filling out bubbles on a standardized grade school test). Regardless, I made up my mind long ago that my miniature painting pokey tool should be cute. And I have yet to find one after two years of painting, so I decided to make one myself using Sanrio's Chococat key holder and a pin. I started out using a pin from my old sewing kit and quickly realized the plastic ball on the top just wasn't going to work. The top warped the key cover and removing the ball wouldn't allow the super glue to adhere properly.

So I dug around in the depths of my old sewing supplies and found my magnetic pin cushion. I needed a T-pin to be able to glue the flat, wide surface area to the inside of the key holder. Unfortunately, finding a T-pin proved difficult-- kind of like finding a needle in a... well, needle stack. After suffering only one minor puncture wound, I found a T-pin and prepped my final supplies.

Once I applied super glue to the top part of the T-pin, I placed it inside and centered it, leaving about 25% of the T-pin inside the key cover. Then I held it together until the glue set, about 1 minute just to be safe. I love this picture-- it looks like Chococat is grimacing because I'm smooshing his face while the glue dries. Then I let it sit on my desk for about 5 minutes.

Next, it was time for the final test! I gathered a stubborn dropper bottle of paint and hoped for the best!

Success! Not only did the super glue hold well, the rubber key cover was incredibly comfortable to grip (unlike pins without handles) and it came away cleanly after poking through the top of the stubborn paint bottle. I'm very pleased. Not only do I have a cute & unique custom pokey tool, I can replace the chain and hang it on a peg by my desk for easy access. Brilliant. 

If you're thinking about making your own miniature painting pokey tool, consider using a T-pin and a key cover/key holder. Or create something similar out of clay, push T-pin into the center before baking in the the oven until set. Then, remove your new pokey tool and let it cool. As long as the clay isn't too thin around the T-pin, it should offer enough support as a pokey tool. Give it a try & share your results with me! Everyone needs a "Pokey Tool" and why not have yours reflect your own personal style? 
Reaper Artist Conference Day 1

Thanks to a series of fortunate circumstances I was able to attend the Reaper Artist Conference (RAC) in Denton, Texas this weekend. I'm splitting my adventure into two parts & I'll share my experiences on Day 2 in my Thursday blog post. So many great experiences and new ideas floating around in my head, it's hard to know where to start! 

On Saturday morning, as I made my way to Reaper HQ Saturday morning in nervous anticipation, I enjoyed a beautiful sunrise and the promise of a beautiful day (not that I'd need to spend much time outside!) 

The Reaper staff was there bright & early and the space was decked out in Halloween-themed decorations. I'm happy to say that I was able to work in several great classes both days! First up was Jennifer Greenwald's "Painting Modern Figures". I admit, my Chronoscope miniatures are the most unloved miniatures sitting on my "Shelf of Shame", a term I learned at RAC. While the figures are sculpted well, painting modern things is considerably more challenging than painting, for example, an imaginative magic staff on a figure clearly based in fantasy. Painting denim needs to be convincing, since people see it on a daily basis. Jennifer gave me some great ideas & tips for adding interest to simpler sculpt with lots of surface area to play with. Here are a few of her miniatures she passed around to the class-- I look forward to trying her ideas including painting a striped, cracked pavement base.

After that, I took a break for sustenance! Found a great little sushi place down the street where I was able to meet up with some family for lunch. Cue the gratuitous pictures of food!

Next up, Shaded Metallics with Michael Proctor! I had the pleasure of meeting Michael at this past ReaperCon where I was first introduced to his style & use of dynamic colors. After trying my hand at the NMM (Non Metallic Metal) technique, I decided that there's just as much value in painting with metallic metals, as long as you approach it in the right way. I've attempted a few TMM (True Metallic Metal) miniatures, though I couldn't seem to produce the desired effect that I wanted. His class opened my eyes to incorporating color glazes and shading applications to creating different types of metal effects. While I love taking these classes, I find it most rewarding to watch painters paint, see what they use & exactly how they use it. Here's a picture of Michael's workspace during his demo (taken with his permission of course).

This was a paint-along class and my demo miniature turned out better than expected. I tried techniques in both silver-steel & gold-bronze. Can't wait to apply my new knowledge to miniatures with lots of sculpted armor!

Last but not least was Derek Schubert's "Painting Monochrome", where I excitedly took notes on how to identify certain values and assign those values to different textures and surfaces. Derek is one of my favorite painters and I was so happy have some one-on-one time with him at the last ReaperCon. His intelligent & practical approach to painting really resonates with me. As he explained in his class, when painting monochrome, one isn't distracted by colors and can focus on assigning light & dark values to achieve high contrast in their miniature. Of course, those same techniques can be applied to colorful miniatures as well. I can't wait to try painting a sepia-toned miniature with lots of different textures.

On a side note, while recording instructors is understandably prohibited at these events (and taking photographs of them without their permission is quite rude), I focus on taking an appropriate, if not a bit blurry, picture of the table. Here, Derek brought some example minis & source materials during his class to show & share. I'm not sure why this picture makes me smile so much but it does! Maybe it's the photo of Sean Lennon and his thoughtful expression that seems to say, "Hrm, yes, it's true. Painting in monochrome is never boring."

One photo I didn't get was of my own miniature in the Halloween painting contest. Since traveling to Denton, Texas was a bit rushed, I don't have a picture of my own mini! I hope to have one as soon as I'm back. While I'll have more information & pictures about the painting contest to share on Thursday, I can let you in on a secret and tell you my great experience at RAC may have been made even sweeter after these guys were involved...

See you Thursday!

Speed Paint Challenge 3

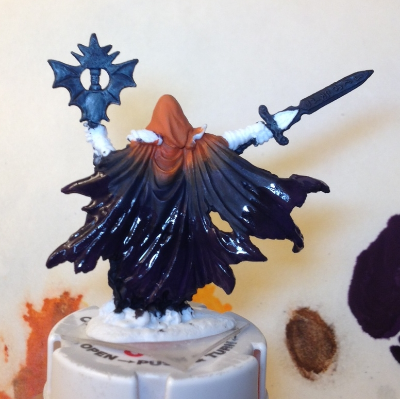
Happy Miniature Monday! I'm happy to report that I'm getting faster with this speed painting thing. Again, I'll use "Speed Painting" loosely, since I consider anything between 2 - 4 hours a creative race against time. This past week, a new mini was chosen by @catafracture, a new participant in our last #speedpaintchallenge. The Reaper Bones miniature we agreed upon was cheap ($2.79) & Bones in general are relatively low maintenance and don't require priming-- perfect since I would need to paint him while traveling. The standard rules applied: 7 colors, less than 4 hours. Here's what I came up with in 3.5 hours total (4 hours if you include the increased drying time):

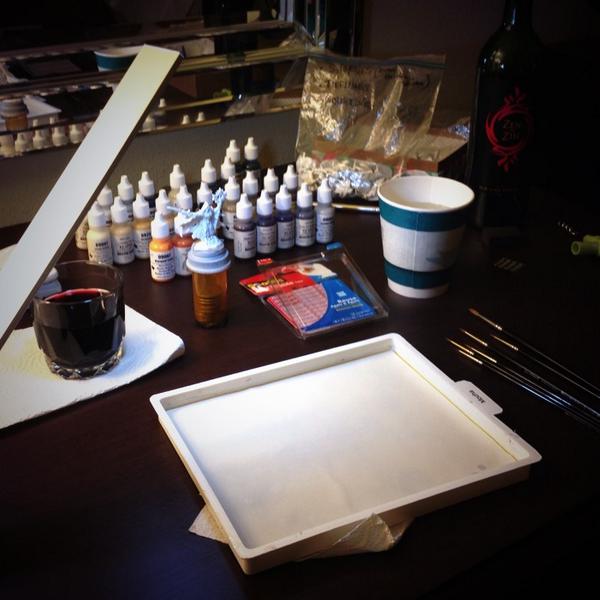
I didn't expect humidity to be as big of a challenge as it was. 30 minutes into my initial venture, I found that the paint layers just weren't drying-- adding considerably to my overall paint time. Very frustrating after spending the time unpacking & setting up my mobile paint station:

Two days later, while I was still waiting for the weather to settle down, @EpicBlueMouse suggested I take advantage of the humidity and work on wet blending. Why not? At the last minute I changed up my color scheme and swapped out the metallics I had in store for the weapons in order to focus on a cool orange/purple cape concept. It was fun to try and blend rich orange into a dark purple and see how quickly I could create a nice transition. Lastly, I blended the edges of the cape into a lighter, rich purple and was grateful for the mini hair dryer I had available. Without it, I'd be watching paint dry for ten minutes in between each layer. 

I chose to focus my time & effort on the cape color transitions and the details of his armor. The weapons (especially the back view) suffered somewhat, but I think the sacrifice for the end result was well worth it! My final seven paint choices were as follows-- all from the Reaper line:

Leather White, Blue Liner, Marigold Yellow, Burning Orange, Monarch Purple, Nightshade Purple, Dark Skin

Work In Progress Photos

Another speed painting challenge completed, another obstacle overcome, and another skill aquired!